SOCIAL MEDIA

Wednesday 31 May 2017

Remarkable You & Detailed Floral Thinlit

Good Day Crafty Friends
 
It was another stunning day in Perth today, and being such fabulous weather for winter, I got out and enjoyed the sunshine by helping hubby on a set of apartments he is working on. My better half is in the construction industry and I often go to work with him, especially on the larger jobs. Its great for the crafting budget but cuts into my crafting studio time something chronic!
 
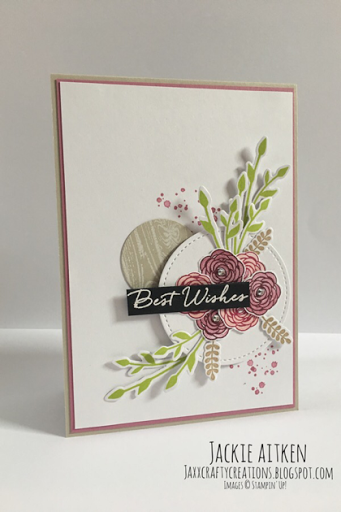
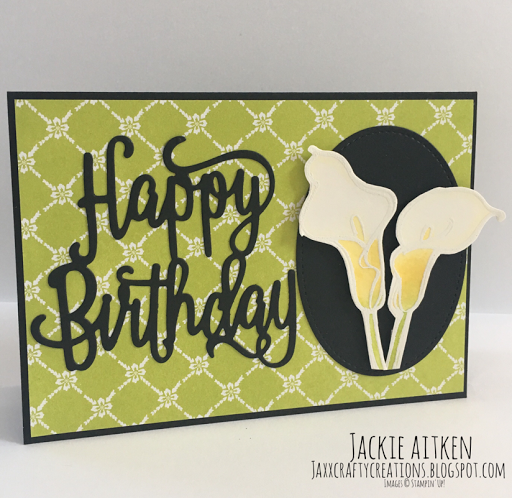
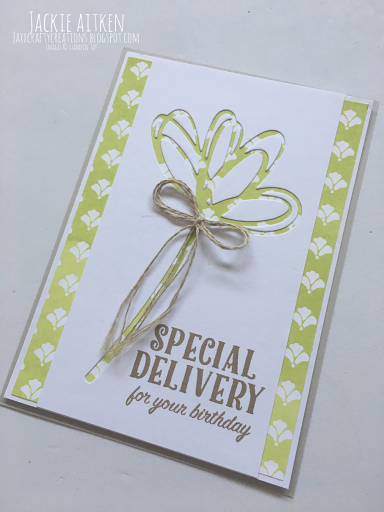
I finished off this card last night before bed as it needed to be posted today to ensure its timely arrival for a special birthday next week.


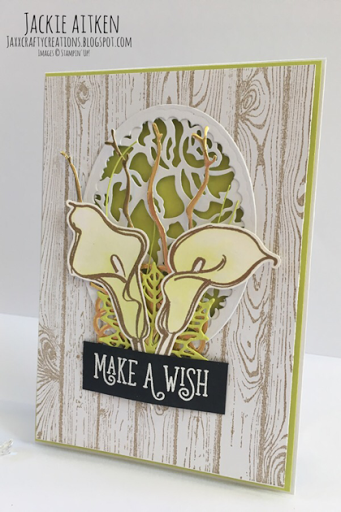
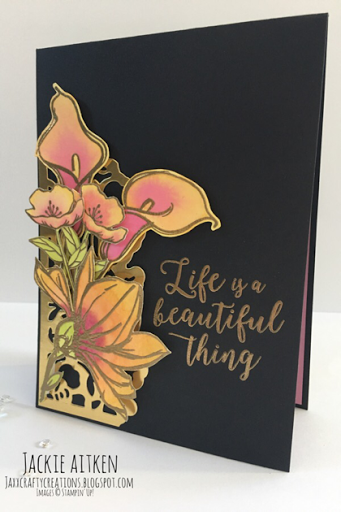
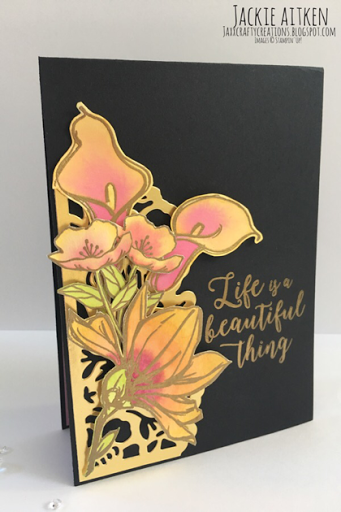
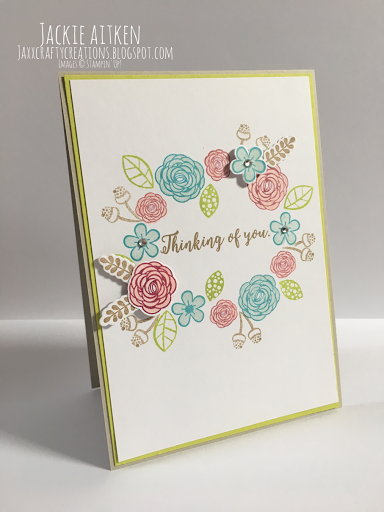
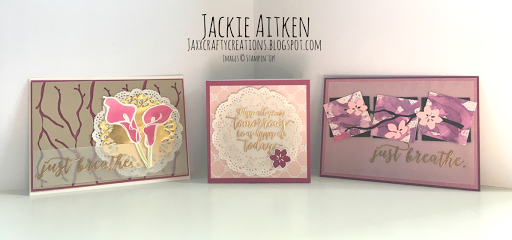
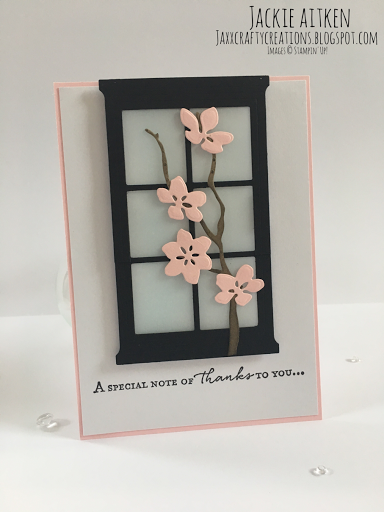
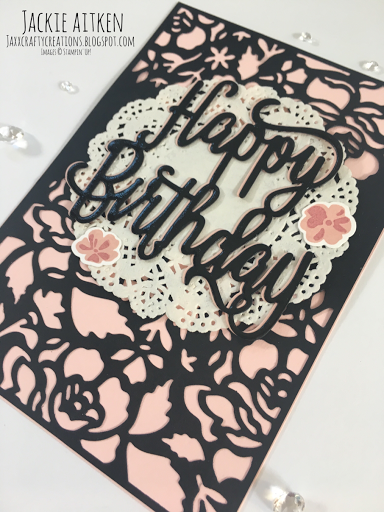
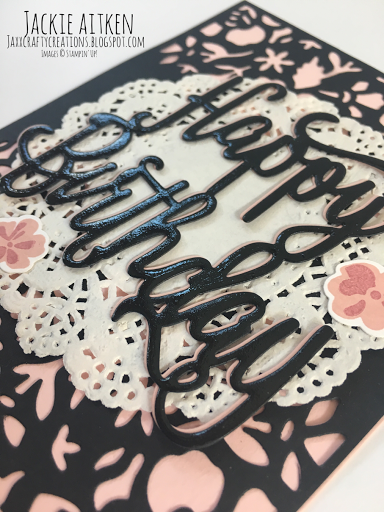
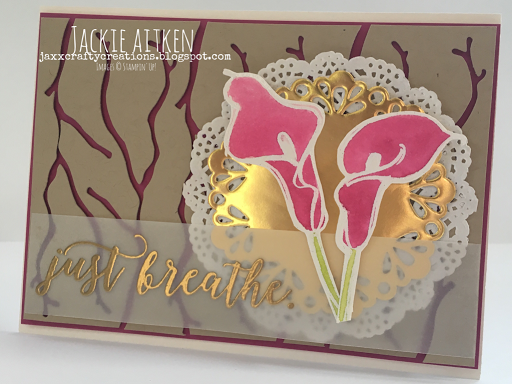
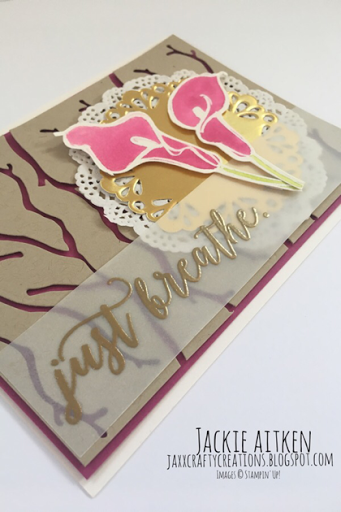
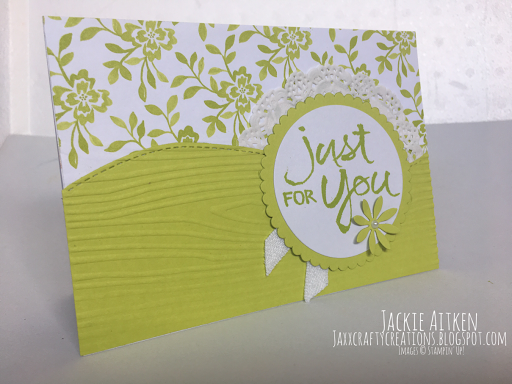
I started with a Thick Whisper White card base and attached to this a layer of Lemon Lime Twist. For the card front I inked the Background Wood Grain stamp in Crumb Cake and stamped onto whisper white. Using the layering Oval thinlits to cut the void in the card front and also the border for the lattice piece. The lattice piece is cut using the Detailed Floral Thinlits from whisper white card.
 
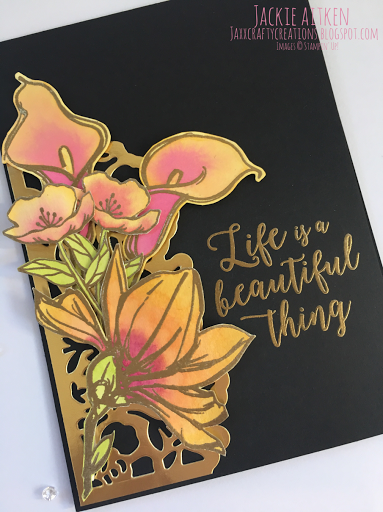
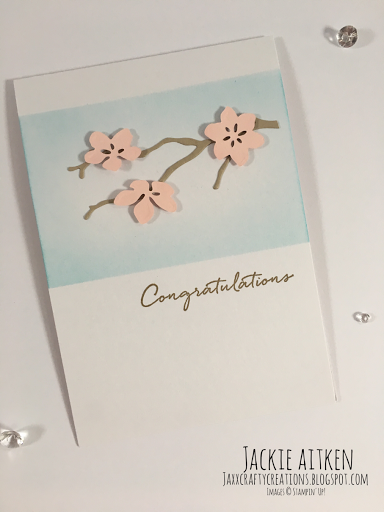
I attached the card front to the lemon lime twist later with dimensionals. The scalloped oval border was adhered to the card front using Tombow.  The Calla Lilies from the Remarkable You stamp set were heat embossed in gold and water coloured using Lemon Lime Twist.


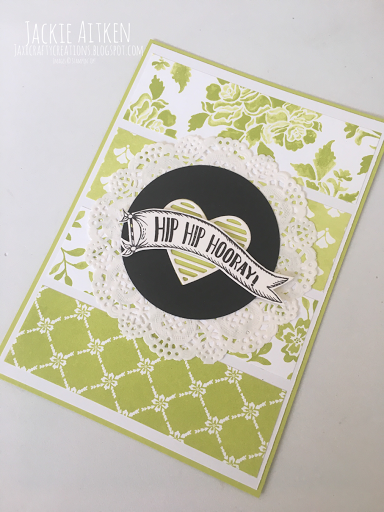
The sentiment "make a wish" is from the Happy Birthday Gorgeous stamp set and was heat embossed in white on basic black card.  I tucked in behind the sentiment with the Calla Lillies, a small gold foil doiley and die cuts from the Colourful Seasons bundle in gold foil and Lemon Lime Twist.
 
I am finishing off another two birthday cards tonight which hopefully, life allowing lol, I will post tomorrow. Until then, stay crafty x


Tuesday 30 May 2017

Just Add Ink #361 - Remarkable You

Hello & Welcome Crafty Friends,   

I have decided to enter my very first blog challenge today!! Scary stuff for such a newbie - I feel nervous just talking about it. But, they say writing it down is a form of commitment, so it's done now - that means I have to follow through and enter!

Plus, the two main reasons I started a blog was to share my crafty creations, and to be able to enter challenges. Entering competitions like a blog challenge or blog hops requires you to put your creative hat on and design. Simply use the products you have at your disposal and follow the challenge guidelines to create a card.

It has been proven that creativity can be learned, through constantly creating and designing. The more you design and make your own creations the easier it becomes to be creative. Hence, why challenges and blog hops are fantastic outlets for ensuring your creativity juices are constantly flowing.

http://just-add-ink.blogspot.com.au/2017/05/just-add-ink-361just-choose-two.html
 
I have decided to enter the Just Add Ink Challenge as I have personally met a few members of the design team at the Stampin' Up! Perth convention in April this year. If you do not have a blog, JAI also accepts entries via email!! The Just Add Ink challenge this week offers a choice - you choose two from the available three concepts. Flowers-Washi Tape- Watercolour. I decided to chose water colour and flowers - surprise, surprise lol.


I started with a black card base and heat embossed the sentiment from the Colourful Seasons stamp set with gold embossing powder.

Using gold foil card stock and the Detailed Floral Thinlits, I cut the smaller of the two detailed end pieces and used this as a base for the flowers. The die cut is adhered directly to the card front using tombow. If I wasn't posting the card I possibly would have raised the die cut with dimensionals opposed to gluing directly onto the card front.


Using Shimmery White card stock I stamped the Floral images from Remarkable You & Birthday Blooms stamp sets in Versamark and heat set using gold embossing powder. The flowers were water coloured using Daffodil Delight, Peakaboo Peach, Berry Burst and Lemon Lime Twist inks, and then fussy cut.


The flowers were adhered using both foam strips and dimensionals as I wanted to achieve a layered look. I thought about adding some gold metallic Twine - but that stuff and I don't get on too well so I canned that idea.  I didn't like the look of any jewels/sequins/rhinestones so I just left it as is.

The card is now in the post making its way to New Zealand - due to the layering, I put my overseas cards in a cello bag first, then the envelope. This helps keep everything attached as the card passes through the postal machines, and also prevents damage if the card is left in a wet letterbox (trust me, twice now, this has happened and both times the envelope was ruined but the card was perfect thanks to the cello bag!)

With loads of family and friends celebrating special occasions in June, I have a busy few days ahead in the craft studio - Yay!!! Hope you get time for you today and get to do something you enjoy, or even try something outside your comfort zone like entering a challenge - until next time - stay crafty x


Monday 29 May 2017

Happy Birthday Gorgeous Stamp Set

Good Day Crafty Friends,

Thanks for stopping by. Today I have a few more cards to share using the Happy Birthday Gorgeous stamp set - both a little florally. 
The card below starts with a Sahara Sand card base, with a layer of the new in colour Lemon Lime twist, topped off with a stamped layer of Whisper White.

happy birthday gorgeous stamp set, stampin up, floral card, jar of love 

Using a pencil I lightly drew a circle onto the whisper white card front to enable stamping the shape easier. Two of the flowers were raised with dimensionals, both with the die cut stamped leaf image from the Jar of Love bundle. I used the following inks: Crumb Cake, Pool Party Tempting Turquoise, Sweet Sugarplum, Powder Pink and Lemon Lime Twist.

jar of love, happy birthday gorgeous, stampin up, floral card

Again with a card base of Sahara Sand I added a layer of sweet sugar plum card stock before adding a layer of whisper white. I stamped a splatter image in sweet sugar plum onto the whisper white before adhering the embellishments.
I die cut a circle from Sahara Sand card stock that had been stamped with the Wood grain back ground stamp in white craft ink. A stitched frame circle was adhered using dimensionals and to that I added the flowers from the Happy Birthday Gorgeous stamp set, the leaves from the Jar of Love bundle and the heat embossed sentiment from the Blooms & Wishes stamp set.
Hope you get time to get into our crafty space and try out some new goodies or pull some old favourites off the shelf and put them to use.

Until next time, stay crafty


Happy Birthday Gorgeous - Stamps

Hello Crafty Friends

I just love experimenting with new goodies. I knew as soon as I saw the Happy Birthday Thinlit I had to have it and the stamp set was an added bonus. 

It wasn't until I opened the cased and inked up the stamps did I find that I really really liked the images and especially all the awesome Birthday sentiments in fonts I adore.


For the card above, I started with a card base in Sahara Sand. On Whisper White card stock I masked a line with painters tape across the centre of the card front. I stamped the images using Sweet Sugar Plum, Powder Pink, Pool Party, Tempting Turquiose, Peakaboo Peach, Crumb Cake and Lemon Lime Twist. I also stamped two extra "nuts" in crumb cake and fussy cut them.

The sentiment was stamped in Crumb Cake after the removal of the painters tape, and then the two fussy cut pieces were adhered with tombow.

The card below also has a Sahara Sand card base with a whisper white card front. The images were stamped using Sweet Sugar Plum and Powder Pink for the flowers, Lemon Lime Twist and Crumb Cake for the other fauna. I stamped the sentiment from the Colourful Seasons stamp set in Crumb Cake ink onto some Sahara Sand card stock. A few fussy cut additions were added and topped with a few pearl embellishments.


I loved the colour combination in the above card, I used it again in a card I designed for a team shoe box swap. I will share that card in a future post. Until next time, happy crafting x


Tuesday 23 May 2017

Colorful Seasons - Blossoms

Hello & Welcome to my blog,
 
I have been playing with the Colorful Seasons bundle and was able to make a few decor pieces in addition to cards with relatively little effort aside from passing dies through the big shot.

 
I spray painted a branch with Black spray paint and cut a gazillion blossoms. To attach them I have used Tombow to adhere two die cuts, front and back of branch.

The next picture shows a quick jazz up of cheap tea light candle holder from Bunnings. 


The card was very simple to create as it's just two window Dies cut and glued with lightly sponged vellum behind.
 

The blue card in the front was inspired by a card created by Natalie Lapakko at stampwitch.blog and I have shared details on two of these cards in an earlier post.

Below is another home decor piece for my daughters bedroom. Spray painted gold Chinese lantern with the branches and blossoms adhered with tombow.


The card above was heat embossed in gold embossing powder on Black stock using the gorgeous sentiment from Colorful Seasons stamp set. A strip of gold foil either side of the card front was then attached to a Blushing Bride card base. The blossoms were stamped in Blushing Bride and Daffodil Delight inks and then die cut and attached with tombow.


The card on the left uses the branch die to create the background Sahara Sand card stock. This was then adhered to a matt of Berry Burst with dimensionals and then attached to a Thick Whisper White card base. The sentiment was heat embossed in gold on vellum and attached using tombow and a sponge. The floral image are the Calla Lillies from the Remarkable You stamp set, and was water coloured using Berry Burst ink.
 
The gift box in the middle was simply decorated using Berry Burst card stock, some Fresh Florals DSP in Powder Pink, gold heat embossed sentiment on vellum, a doiley and a single blossom in Berry Burst card stock.
 
Hope my creations have inspired you to get into your crafty space and make some coordinating gifts for your cards - tags, gift boxes or home décor.
 
Till next post, stay crafty x

Colourful Seasons Bundle

Hello & Welcome Crafty Friends

I have a card to share today that was made with the Colourful seasons bundle - available  June 1st from the 2017-2018 Annual Catalogue. Updated 7/6/2018 - This bundle has been carried over into the 2018-2019 Annual Catalogue.
The bundle is amazing for creating projects with all four seasons in mind. It has beautiful detailed leaves Dies and the snowflakes are so intricate. A beach chair both of which are different in the stamp set to the die, and some gorgeous blossoms. Also included is a scalloped edge die which I have yet to test out.

I used the blossoms dies from the Colorful Seasons bundle in the card below, along with the wood grain back ground stamp. The sentiment was heat embossed in gold on vellum and attached to the card front before adhering the chair and blossom die cuts.

stampin up colourful seasons, hardwood background stamp, heat embossed vellum 

The following card was inspired by  fellow SU demo Natalie Lapakko owner of stampwitch.blog. I don't like to case 100% so took her wonderful concept and changed the colours and used a different sentiment. 

We have a team swap coming up next weekend and I think I will use this card as it has a lot of wow factor and is simple and easy to replicate.

I have used the Stitched Shapes Framelits to cut the black card stock and the ink splatter Whisper White pieces. Inks used for the splattering were Tempting Turquoise, Marina Mist and Night of Navy.


I have made a few décor pieces using this wonderful bundle which I will share in my next post, hoping to inspire you to use your card making supplies for other purposes.

Until next time, stay crafty


Monday 22 May 2017

Remarkable You Magnolia's

Good Day Crafty Friends    

It was Mother's Day here in Australia recently and I got to spend a few hours in my craft room creating.

One of the cards I completed during my "time out" uses the Magnolia flower image from the Remarkable You stamp set.


On Shimmery White card stock I stamped and masked the Magnolia's going up my card front on an angle. The images were stamped in Archival Black ink and coloured using an aqua painter with Powder Pink and Berry Burst inks.

I then lightly water coloured the remainder of the card front with Tempting Turquoise before fussy cutting around the top edge of the stamped flowers.

On a separate card base I stamped the sentiment then adhered the fussy cut card front with foam strips (I like these as they are higher than dimensionals and thin enough to fit into the fiddle cuts)
 
Hope you are inspired to get into your crafty space and try some masking and water colouring, or simply crafting and enjoying some "you time". Till next time, stay crafty x

Colourful Season Bundle - Branch & Flower Dies

Hello Hello

Welcome to my blog Crafty Friends

Today's cards use the new Colourful Seasons bundle. I just adore the blossoms dies for their simplicity.

My first card uses the window die from Heart & Home. I cut two and glued them together so that the long window took up most of the card front.


I lightly sponged the vellum behind the window with Pool Party Ink for a very subtle effect. The sentiment was stamped onto a Whisper White card front which was then attached to a Powder Pink Card Base. The card was finished off with four simple die cuts from the Seasonal Thinlits - the branch and three blossoms.

While I was making the die cuts for the card above I cut a few extra branches and blossoms to use on the card below.


I masked the edges and lightly sponged in Tempting Turquoise. I stamped the sentiment in Crumb Cake ink before attaching the branch and flower die cuts.
 
Its a very simple and elegant card but also very easy to replicate and reproduce a lot of if need be.


When I get a new stamp set or bundle I make an effort to create at least ten cards using my new goodies. This enables me to become familiar with how the images stamp and what the die cuts look like (and the negatives the die cuts leave behind). I find it helps my creativity as I get the immediate cards that were in my head out of the way and as I am doing this new ideas pop into my head.
 
During my first "session" with this bundle I created twelve cards and a few décor pieces which I will share in a future post. Until then, stay crafty x
Sunday 21 May 2017

Happy Birthday Thinlit

Hello Hello Crafty Friends
 
Had a very busy weekend here as the weather for this time of year in Perth has been gorgeous. This extends the amount of time I spend outside my crafting studio....but you cannot complain about that. Sunny and warm days with delightful evenings minus the bugs lol
 
I did manage to quickly whip up one card as I couldn't resist trying the new Happy Birthday Thinlit teamed with the Detailed Floral Thinlit.


I adore black and pink together, and thought this simple colour combo would look striking with these two die cuts. The Happy Birthday Thinlit was die cut twice, once in Powder Pink and then again in Black card stock. I stacked the two by using tombow glue sparingly.
 
To break up the two different dies I added a delicate doily and a two little die cut flowers made using the Jar of Love bundle.
 
As you can see in the picture below, I have treated the die cut to some fine tip glue pen. This makes it glossy and helps catch the eye, so the viewer is drawn first and foremost to the happy birthday enabling the background to be a little more subtle.


Again, such an easy card to make and especially fast if you don't bother with the glossy effect on the die cuts. The Happy Birthday Thinlit allows for fast and easy birthday cards production, and the font and size of the image is just the perfect size to use stand alone or with the co-ordinating stamps and/or other dies.
 
The Happy Birthday Gorgeous bundle includes the Happy Birthday Thinlit and co-ordinating stamps. The stamp set has beautiful fonts, two step floral images and lovely sentiments that can also be used individually or with the Happy Birthday Thinlit.
 
Looking forward to making many more birthday celebration cards with this amazing Thinlit and sharing them with you. Till next time, happy crafting x
Saturday 20 May 2017

Craft Forever Housework Whenever

Good Day Crafty Friends

Welcome to my blog, today I'm sharing a card made with the cutest darn stamp set - all Crafters the world over will love the images and sentiments and in my opinion is a must have set in every craft room!


Starting with a Sahara Sand card base, I randomly stamped the images from the Crafting Forever stamp set in Archival Black ink. I then stamped the images and sentiment on Whisper White card stock and coloured using Stampin' Write Markers (omitting the craft knife of any colour as this is a personal joke between myself and the card recipient). I fussy cut the images and attached to the stitched framed sentiment with dimensionals.

I received a lovely coffee flask for Mothers Day that has a double lining with the purpose of being able to decorate the inside layer and personalising it, so that's exactly what I did.


Crafting Forever - Housework Whenever was such a fitting sentiment to decorate my new craft room flask. I just love it!
 
Using all the images from the Crafting Forever stamp set, I stamped using Archival Black ink onto Shimmery White card stock and water coloured in Berry Burst ink.
 
Hoping all you crafty Mothers got to spend some creative time in your crafty space on Mothers Day. Till next time, stay crafty x
 
Sunday 14 May 2017

Seasonal Thinlits

Good Day & Welcome to my blog of craftiness 

Today I want to share a background I accidentally made when die cutting a heap of branches for an upcoming swap. I was trying to conserve my card stock on each turn I was turning the die upside down.

Anyways this happened......


I also thought when I was doing the cuts on my Big Shot that the little branches looked like Ents - the ancient trees from Lord of Rings (love fellow Kiwi Peter Jackson and all his amazing films!)
 
The Seasonal Layers Thinlits is part of the Colourful Seasons bundle and has nature inspired images covering all four seasons. For this card I have only used 1 of the 17 dies - the tree branch. Vellum, Crumb Cake, Whisper White and Berry Burst card stock were used along with gold embossing powder for the sentiment "just breathe"


I heat embossed the Calla Lillies image from the Remarkable You stamp set in White Embossing Powder and water coloured the flowers with Berry Burst and Lemon Lime Twist inks. A gold doily to match the heat embossed sentiment and then a Delicate Details doily underneath.
 
Hope I have inspired you to get into your crafting space today and perhaps you too will have a happy accident like mine x

Happy Birthday Gorgeous & Calla Lillies

Good Day Crafty Friends

I got to use the new Happy Birthday Thinlits today.....Oh Wow!


It allowed for me to whip up this card in under five minutes - given the heat embossed and water coloured flower images were already done from a previous crafting session. These beautiful Calla Lillies are from the Remarkable You stamp set - one of three large floral images.
 
I have also used some of the new Fresh Florals DSP in Lemon Lime Twist (I just love this new in colour with Black) The Stitched Shaped Framelits were used to cut the oval background behind the flowers.
 
The soon to be released (June 1st) Happy Birthday Thinlit is also part of a bundle called Happy Birthday Gorgeous - although as with all Stampin' Up! bundles you can purchase each component individually but when you buy as a bundle you save 10%. I cant wait to ink up the coordinating stamp set, it has some beautiful sentiments, in a font I adore and small floral images that will provide endless variations.
 
Hope you are having a crafty day and get to make something to inspire or share with someone else x

Remarkable You Tulle Card

Good Day Crafty Friends

The Australian Post Courier arrived yesterday!!! He brought a few new to me items (in current catalogue) and some new pre-order items from the soon to be released catalogue (available June 1st)

I had been sitting on the fence with the Remarkable You stamp set, up until I had discovered my love for the Birthday Blooms set. When I finally realised that in fact you do like flower image stamps Jackie, I went hunting for similar large flower images in the catalogue and boom "Remarkable You" - how did I not notice you earlier (hugs new stamp case)

Even though among my new shipment of goodies I had the choice of new pre order goodies to play with, this stamp set was the first I inked up today.


I also got my first batch of foil doilies (having also just realised I have an addiction for the delicate doilies I figured I'm going to love these too - and I do!)

This shaker card uses Tulle to hold the sequins - which are retired but they went so perfectly with my colour scheme (insert happy face)


The little Thank You sentiment is heat embossed in gold and is from the Love Notes Bundle. The Magnolia flower was water coloured in Blushing Bride ink to coordinate with the Cardstock. I also used the Hexagons Embossing Folder for the Whisper White card front.

Hoping you had time to craft today and my tulle card provided some inspiration.

  
Wednesday 10 May 2017

Jar of Love Tulle Shaker Card

The Jar of Love stamp set is so versatile, without using the "jars" the flowers and foliage images make lovely arrangements and wreaths. 

Having watched a tutorial by Jennifer McGuire Ink this morning, I couldn't wait to give it a go, as it's rare I have everything I need for a project. All that this card required that was out of my ordinary card making supplies was Tulle. I didn't have any white, only pink and blue, so I went with pink.


The sequins are sandwiched between two pieces of Tulle and actually shake quite freely but not all dropping to the bottom of the display opening as with normal shaker cards when card is completely upright.


I used Blushing Bride and Whisper White card stock. The White layer was embossed using the retiring Polka Dots embossing folder (insert sad face). The Ovals were cut using the Layering Ovals Framelits and the sentiment "For the Newlyweds" is from Teeny Tiny Sentiments.
 
The floral arrangement was stamped using Powder Pink, Blushing Bride and Crumb Cake inks and various images from the Jar of Love Bundle.
 
Tulle Shaker/Window cards are great for posting as they have no more bulk than the average card. No fiddling with foam strips - just double sided adhesive and the uber thin Tulle.
 
Hope I have inspired you to give this type of card a go. I know I will be making a lot more of them in the future as they are very feminine and so easy, and who doesn't like an easy and fast card!
 
Have a crafty day x


Fresh Florals DSP - Lemon Lime Twist

Welcome Crafty Friends,

Today I am sharing a set of cards using my new favourite in colour for 2017-2018 and the new Fresh Floral's DSP. The Lemon Lime Twist is just delish. Its so bright and clean, I can see myself using a lot of this colour in the future.


The card below uses Whisper White card stock and the flower thinlit from the Sunshine Wishes bundle. I die cut the flower and put that aside and used the remaining piece to stamp the sentiment on and then attach over the DSP using dimensionals.


I have stamped the sentiment from Birthday Delivery in Crumb Cake and tied a small bow using some neutral Bakers Twine. Each side of the card front has been lined with a 1" strip of DSP and then attached to a Sahara Sand card base.

The next card uses a sentiment from the Watercolour Words stamp set and has been kept simple with just a white and Lemon Lime Twist colour scheme.


Black and Lemon Lime Twist are amazing together! The contrast is striking. The card below showcases four strips of the different prints in the DSP pack. I then added topped a Doiley, and over that a black circle with the heart die from the Love Notes Bundle backed with some Lemon Lime Twist card stock to make it pop. The sentiment is from the soon to be released Birthday Delivery stamp set. I just love the banner - there are two sentiments in this set that fit the banner, so even better!!!


Cant wait to team Lemon Lime Twist with other colours in the SU Rainbow! Looking forward to sharing those with you soon.
 
Happy Crafting x